Disclosure: I work for Apollo Automation. The wiki I mention below is ours.
Every product page on the wiki needs short screen recordings: here’s the pairing flow, here’s what the dashboard looks like, here’s the setting you’re hunting for. And every time someone asks a question on Discord, the fastest answer is usually a ten second clip. The recordings are easy. Getting them into something small enough to actually post is where the time went.
My screen recorder is happy to hand me a GIF. The demo recording for this post came out at 53 MB. That doesn’t embed anywhere, and Discord laughs at it. So the real workflow was ffmpeg, every time, by hand.
The script era
I started where everyone starts, a PowerShell script in a folder. Drop videos next to it, run it, get animated WebP out. It did the right things (two-pass palette generation for GIFs, lanczos scaling, sane fps defaults) but every adjustment meant editing the script. Then I wanted trimming, so I made a second script that prompts for start and end times. Typing 19 at a prompt to cut a clip at 19 seconds works, but you’re guessing at timestamps by scrubbing a video player in another window.
What gifify is
gifify is that script with the UI it always needed. It runs on your own machine (Node + a Svelte page in your browser, ffmpeg does the actual work) and nothing gets uploaded anywhere.
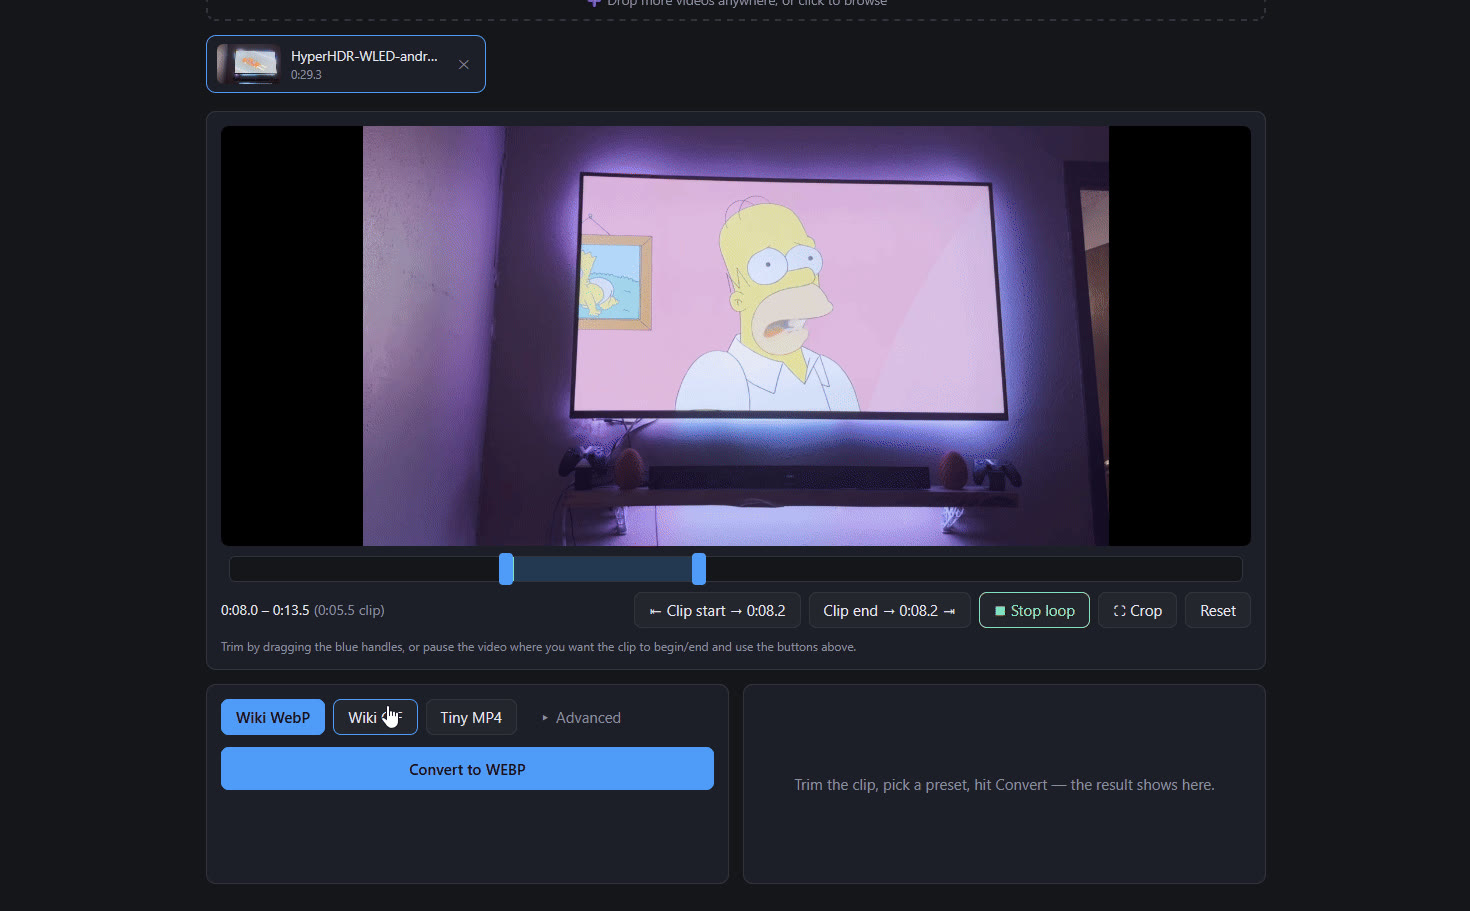
Drop a recording in, and you get a video player with drag handles for trim, a crop box you draw right on the frame, and preset buttons. Wiki WebP is 24 fps at 720px, which is what almost everything on the wiki uses. Wiki GIF and Tiny MP4 cover the places that want those instead. Hit convert and the result plays right there with its file size next to it. If 2.1 MB isn’t small enough, drop the quality slider and convert again, both attempts stay in a history so you can compare. There’s a Markdown button that copies a ready-to-paste snippet for the wiki.
That 53 MB GIF? The WebP preset took it to 5 MB at better quality. It’s the demo animation in the repo README now.
Two bugs worth writing down
GIF conversion sat at “converting 0%” for the whole first pass and I initially blamed a UI toggle I’d just clicked. The actual cause: GIF encoding runs two ffmpeg passes, and the first one (palette analysis) outputs a single image, so ffmpeg’s progress reporting has nothing to report. On a 60 second test video it emitted exactly one progress line, at the end. The fix was honesty, the UI now says “analyzing colors” with an indeterminate bar instead of a fake percentage.
The second one had been lurking since the script era. ffmpeg’s -t flag means “stop after this much time,” but where you put it matters: after -i it limits the output, before -i it limits the input. With the original script that distinction never surfaced. The moment I added a 2x speed option, a clip trimmed to 20 seconds started pulling in 40 seconds of source, because 40 seconds of sped-up input fits in 20 seconds of output. Tests caught the duration being exactly wrong, 20.0 where it should have been 10.0.
If you want it
It’s MIT, on GitHub. You need Node and ffmpeg, then it’s clone, npm install, npm start. On Windows there’s a tray launcher, double-click gifify-tray.vbs and it lives next to the clock with a right-click menu. Every clip I’ve posted since building it went through it, and if you write documentation or answer questions with screen recordings, it’ll probably save you the same time it’s saving me.